Showing posts with label halloween. Show all posts

Tuesday, February 7, 2012

Back in Time-Halloween

I found a couple more projects that I created during my blog hiatus, though this time they are Halloween. I know that Halloween is long over, but I wanted to share them anyway with you.

Speaking of the Matchbox Treat Box...if you still aren't convinced how versatile and wonderful this little treat box is yet after several examples, maybe this one will push you over the edge. :)

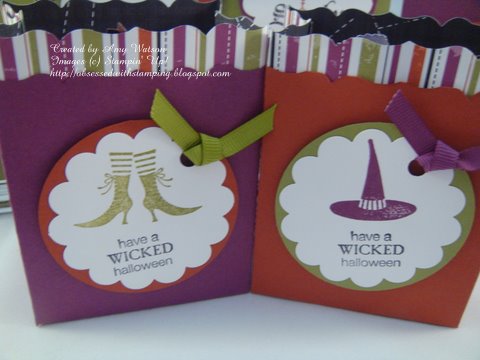
For my department at work, I made these little treat boxes for Halloween. I did use the bat punch, which has since been retired, but he was too perfect to leave off these adorable little boxes. I used the "Frightful Sight DSP" as my starting point and color inspiration, then use belly bands for the Hershey nuggats from a stamp set in the Holiday Mini Catalog. I also made little mini cards to coordinate with the boxes.


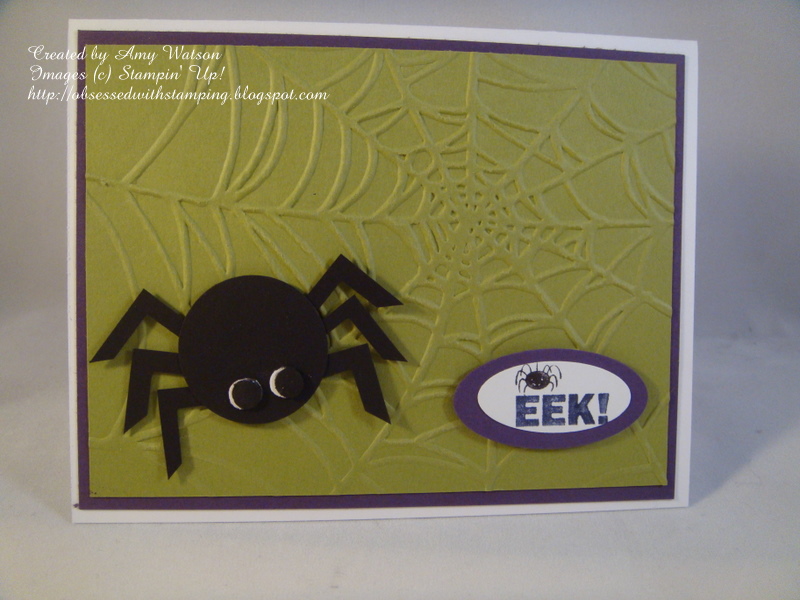
Since we are on the topic of Halloween and "EEK," here is a Halloween card that I made using punches for the spider. See the Spider Web in the background? That was created using the Spider Web Textured Impressions Embossing Folder!


Tuesday, November 2, 2010

Happy Halloween!

This past weekend was full of Halloween festivities. We hosted a Halloween party at our house on Saturday, so I decided to make candy favors for all of the guests to take home with them. The fancy favor die makes perfect goody bags and you can run them through the Big Shot in a flash. I added a dash of color with the extra line of DSP at the top of the bags. I also used the handy-dandy textured impressions spider web embossing folder to emboss the napkins for they party--they turned out great!


Thursday, September 23, 2010

Trick-or-Treat Candy Jars

I hope you aren't too tired of Halloween projects yet, I told you I had a bunch! :) One final project inspired by Brent Steele's presentation at convention with the Halloween products from the Holiday Mini: Trick or treat jars!

When Brent created a project using the "trick-or-treat" portion of the Spooky Things Decor Elements, he adhered the words and Designer Jewels onto white pumpkins. When I went to our local craft store and saw that they wanted $22 for an artificial pumpkin (!!!) I nearly had a heart attack and decided there must be something less expensive that I could use that would still have the same cute, creative effect...then I thought, "what better project to represent Halloween than candy jars?" so I went back to the glass jar section and picked up 3 glass jars (which were half-off, for a total of $2.50!!).

I went home and adhered the "trick-or-treat" words onto the glass and then transferred portions of the Black Flourish Designer Jewels onto the jars. Putting some colorful Halloween candy into the jars will give them the perfect finish, although our store didn't have Halloween candy out on the shelves yet, when these pictures were taken, but you get the idea. ;)


Wednesday, September 22, 2010

Oct 31 Luminary

Another project inspired by Brent Steele at convention: Halloween luminaries using the Spooky Things Decor Elements from the Holiday Mini. The decor element images are so versatile and there are so many creative projects that you can make with them! These luminaries took a little bit of time, so I decided that instead of making 6 of them (like he did), I'd make one for the inside of my house and save the other pieces of decor elements for a couple of other projects I have in mind, which I will share with you after I complete them. Hubby frowns upon decorating my house too early for any one holiday so I'll have to wait until I decorate to share those project ideas with you. ;)


Tuesday, September 21, 2010

Treat Tubes

Shelli (co-founder and CEO of Stampin' Up!) often inspires me to create projects and the project that I'm sharing today is a CASE of a Halloween project she did recently. I loved the simplicity of the treat tube and how easy it was to replicate.


Monday, September 20, 2010

Halloween Design-a-House

Halloween is one of my favorite holidays to decorate for, after Christmas. Stampin' Up! has made decorating much easier with all of the wonderful, crafty products they have in the Holiday Mini Catalog.

At convention, Brent Steele challenged us with a unique twist on the Design-a-House decor accents from the Holiday Mini and transformed the solid white cardboard house into a spooky haunted house. Honestly, I wouldn't have given this house a second thought as the traditional gingerbread house, but seeing a project taken to another level was just inspiring. So I took Brent's project and CASEd it changing up a couple of things.

NOTE: Learn from my mistake and choose a non-windy day to spray paint your house outside. Mine rolled in the grass twice, so I had to cover up a few "boo-boos" with bats and embellishments. No mistakes, only opportunities, right? :)


Friday, September 17, 2010

Halloween Frame

This project was inspired by a project in the Holiday mini catalog featuring the Spooky Things Decor Elements. I simply applied the "Happy Halloween 31" decor element onto the glass portion of the frame, and then decorated a piece of Whisper White card stock to place behind the glass. I applied a few punches bats to the front of the glass and tied a piece of retired Rich Razzleberry ribbon around the glass before inserting it back into the frame.


Thursday, September 16, 2010

Spooky door post

Halloween is one of my favorite holidays to decorate for! Get ready because the next few posts are going to revolve around just that--Halloween home decor. Most of the ideas are CASEs (Copy And Share Everything) but I have tweaked them some.

Today's project was inspired by my friend Nikki. I used some extra chipboard to cut down the door hangar to the right size and then used some of the "Wicked Fun Specialty DSP" to spruce it up. The chipboard letters that spell out "SPOOKY" are retired, but you can always use our current chipboard letters for the same project. The "Wicked Cool" stamp set is easily one of my new favorite holiday stamp sets and is my Go-To stamp set for all things Halloween! The new luscious raven 1/2" lace from the Holiday Mini Catalog adds a nice touch to my trim and is also used to hang the door post onto the door.


Thursday, August 26, 2010

Holiday Mini Sneak Peek Pt. 2

Halloween is one of my favorite holidays-I love the color palette, the pumpkins, the candy, the spooks, the costumes, the decor. It's so fun! Today's card features a couple of new items in the Holiday Mini Catalog: the new Spider Web textured embossing folder, Basic Black waffle paper (that's just fun to say!), and the delicious Raven lace trim.

The trick to using the waffle paper with punches, is to punch the waffle paper with a piece of card stock behind it to keep the waffle paper from tearing when punched. To make a bit more sturdy when adhering it to my card, I went ahead and adhered the waffle paper to my piece of card stock before punching and then placed both pieces on my card.

The "Wicked Cool" stamp set is new to the Idea Book and Catalog and it happens to be my favorite Halloween stamp set that we offer!


Related Posts Plugin for WordPress, Blogger...